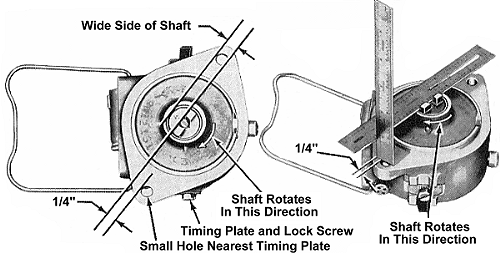
Fig FO83-Distributor
basic timing for front mount distributor. (I&T shop manual, FO-4)
Remove necessary wiring for distributor removal (plug
wires from distributor cap and high-tension wire from top of coil).
Unsnap the coil bail and distributor cap clips, then remove the coil
and cap. Remove the two distributor mounting bolts. Remove distributor
and take your assembly to the nearest workbench.
Set distributor points to .015 gap. Next, place a straight
edge on the wide side of the tang on shaft as shown in fig. FO83. Rotate
the shaft until the straight edge is ¼" away from the outside edge
of the distributor mounting hole. At this distance, the distributor
points should start to open. If not, loosen the timing plate lock screw
and turn to advance or retard the timing. Keep adjusting until you get
the proper ¼" setting. As you're adjusting, eliminate backlash
by turning the shaft backwards and bring the shaft forwards to measure
your setting. This ¼" setting will get you static timing at top
dead center. That's what you want.
Reassemble in the opposite order. When mounting the distributor
back onto engine, the slot in the end of the camshaft (front of motor)
is offset. So the tang on the distributor can only mate easily to the
slot on the engine camshaft one way. It will slide on easily without
force and fit flush to the motor. If the tang is 180 degrees off, the
distributor will have to be forced on and as soon as you tighten down
the mounting bolts, the casting on the distributor will break. It may
be in your best interest to mark the position of the tang with a couple
of marks on the back of the distributor upon removal from the engine. |